Master AI & Build your First Coding Portfolio with SkillReactor | Sign Up Now
Python
To build our API, we'll use a popular Python framework called Flask. Think of a framework like Flask as a helpful kit. It has lots of tools and features already made for you, so you don't have to build everything from scratch. Flask is great for beginners because it's simple and easy to learn. It's like getting a head start in making API!
Setup Environment
Install Python:
To get started, you need to download and install Python from here.
Create a project directory:
Now, create a project folder and navigate inside that folder using the following command.
cd C:\Users\yourname\project
Create a Virtual Environment:
A virtual environment enables developers to keep the projects isolated from each other so that they do not interfere with each other’s functionalities.
To create a virtual environment for your project, you must first open Command Prompt using Windows or Terminal using macOS. In the command prompt, navigate to your project folder (if you have already created it otherwise, create a project folder) by typing the following command:
cd C:\Users\yourname\project
Install virtual environment on your system using the following command.
pip install virtualenv
Now run the following commands to create a virtual environment in your directory. The following command is for macOS.
python -m venv venv
source venv/bin/activate
For Windows, you can run the following commands:
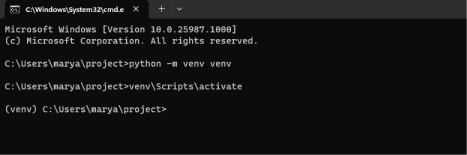
python -m venv venv
venv\Scripts\activate
You should see something like this on your screen if you successfully create a virtual environment.
 .
.
Install Flask and Psycopg2:
We first need to make sure that pip is installed on our system. You can check this by typing the following command in Command Prompt.
pip –version
If pip is not installed and you cannot see the pip version, then you need to install pip using the following command.
py -m ensurepip --upgrade
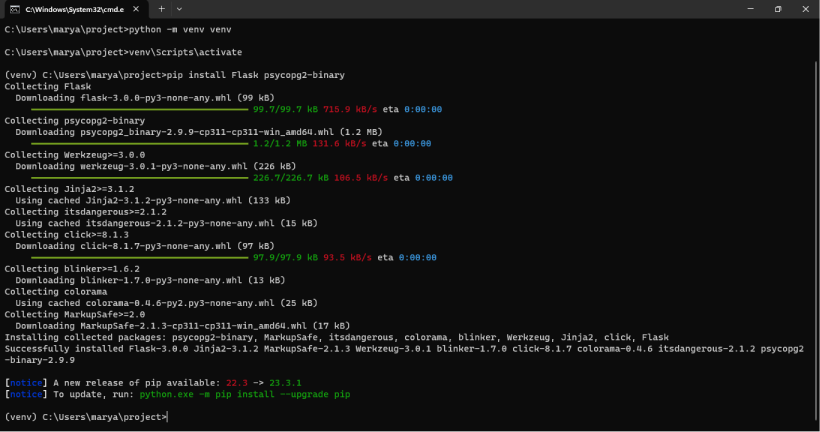
Now that pip is installed, lets install other dependencies. In our project, we will be using PostgreSQL for the database. In Python, Psycopg2 is an adapter for Python. In the virtual environment you created above, install Flask and Psycopg2.
pip install Flask psycopg2-binary
Your installation should look something like this.
Create Endpoints using CRUD operation
In web development, CRUD stands for Create, Read, Update, and Delete. These are the four basic operations we use to interact with a database. In this article we will assume that you have created your database which we will refer to as db in the code provided below. The code for our database is written in app.py from where we are importing it in our models.py and routes.py files. In our Flask app, we'll define data models in a models.py file and set up API routes in a routes.py file. Let's see how to do this:
Defining Data Models
In models.py, we define the structure of the data we want to store in the database. Each class in this file represents a table in the database. Here's an example:
from app import db

class Item(db.Model):
    id = db.Column(db.Integer, primary_key=True)
    name = db.Column(db.String(50), nullable=False)
In this code, we define a simple Item class with two fields: id and name. id is the primary key, which uniquely identifies each item, and name is a string field to store the item's name.
Setting Up API Routes
In routes.py, we define the functions (or 'endpoints') that will handle requests from users and interact with the database. Each endpoint corresponds to one of the CRUD operations.
Here's how you can set up these endpoints:
from flask import jsonify, request
from app import app, db
from app.models import Item


@app.route('/items', methods=['GET'])

def get_items():
    items = Item.query.all()
    return jsonify({'items': [{'id': item.id, 'name': item.name} for item in items]})


@app.route('/items', methods=['POST'])

def create_item():
    data = request.get_json()
    new_item = Item(name=data['name'])
    db.session.add(new_item)
    db.session.commit()

    return jsonify({'message': 'Item created successfully'})
In this code:
@app.route('/items', methods=['GET']): This line creates an endpoint for the URL/itemsthat responds toGETrequests. A GET request is used to read or retrieve data. The functionget_itemsfetches all items from the database.@app.route('/items', methods=['POST']): This line creates an endpoint for the same URL but responds to POST requests. APOSTrequest is used to send new data to the server. The functioncreate_itemadds a new item to the database.
Run your app by typing the following code in your run.py file.
from app import app

if __name__ == '__main__':
    app.run(debug=True)
You will be able to access your app at the URL provided when you run the app. Congratulations, you have created your API! Now to test if the API you have created is working correctly, we will use Postman. Postman is an API development tool which helps you test your API to get rid of any errors in it. Like Postman, there are many other API developemnt tools you can use for API testing like Insomnia, Swagger, etc.